Carburettors versus electronic fuel injection (EFI); automotive fans above a certain age will be well versed in the differences. While early EFI systems had their failings, the technology brought with it a new standard of reliability and control. By the early 1990s, the vast majority of vehicles were sold with EFI, and carburettors became a thing of the past.
The Mazda Miata was no exception. Shipping in 1989, it featured not only multiport fuel injection, but also a distributorless ignition system. Consisting of two coilpacks in a wasted spark configuration, with computer-controlled timing, the system was quite advanced for its time, especially for a budget sports car.
Despite the Miata’s technological credentials, those in the modified car scene tend to go their own way. A man by the name of Evan happened to be one such individual and decided to do just this — scrapping the EFI system and going with a retro carb setup. It was around this point that this I got involved, and mechanical tinkering ensued.
But why?
It’s true that the Miata’s stock EFI system is perfectly capable of doing its job, and is also capable of handling some mild engine modifications without too much trouble. Those building for higher power levels will usually replace the ECU, injectors and fuel pump in time, but the general architecture of the system is kept intact.
However, this is not to say that carburettors don’t have their merits. Due to the Miata’s engine layout, it’s possible to fit a set of twin carbs with the right manifold, and have a very short intake runner length. This has the benefit of both reducing intake restriction for more power, as well as greatly improving throttle response. Given the restrictions inherent in the standard intake and air flow meter, there are significant gains to be made here. Additionally, such a setup can increase induction noise considerably, which is a big plus point to those who enjoy the symphony of a naturally aspirated engine. Finally, having a unique build is a great way to score some solid attention at Cars and Coffee, even in the face of expensive Italian competition, and this can’t be discounted.
Alternatively, just refer to the title of this article!
But… This Engine Wasn’t Designed for a Carburettor
Obviously, fitting carburettors to a car never designed to have them takes some doing. It’s made all the more complex due to the Miata’s computer-controlled ignition system. This means that modifications to both the fuel and ignition systems are required in order to pull off the modification.
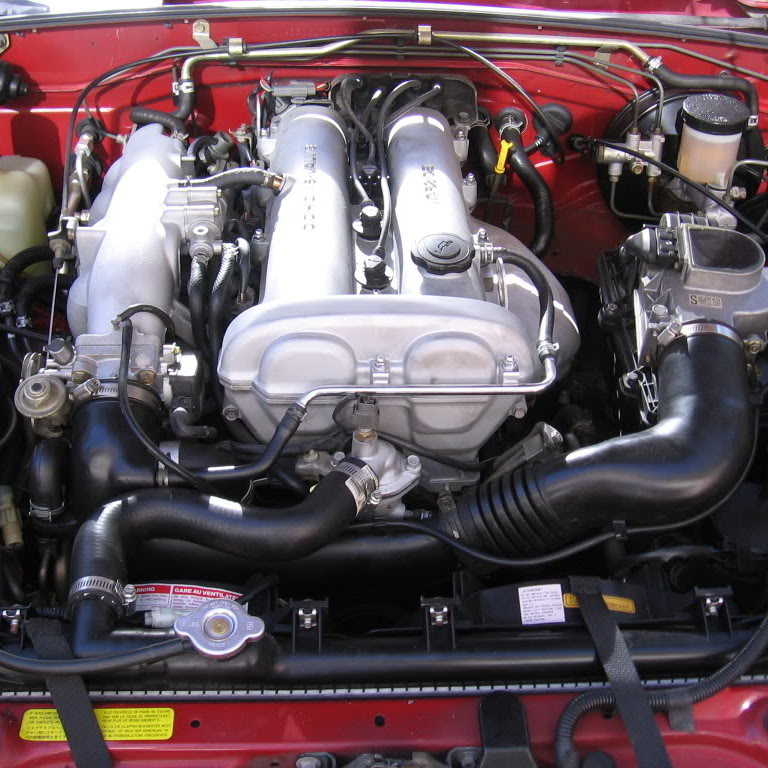
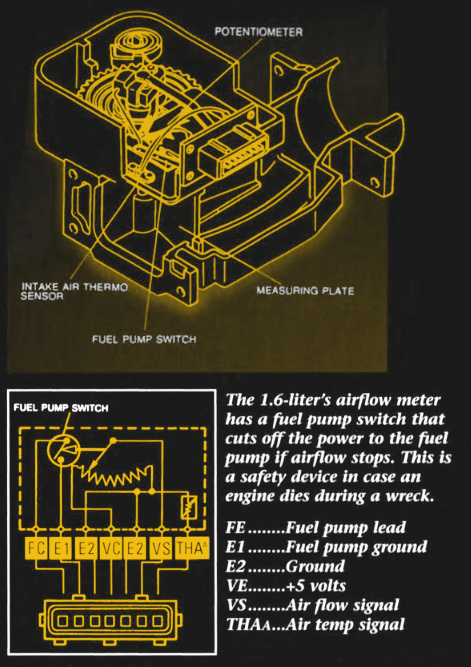
The work required has been documented by Norman Garrett, in the Mazda Miata Performance Handbook, from the era when print still reigned supreme (pages 79-82). The first step is to remove a whole bunch of hardware that is no longer required. The original intake manifold, intake piping and air flow meter are all removed, as they are not compatible with the carburettor install.
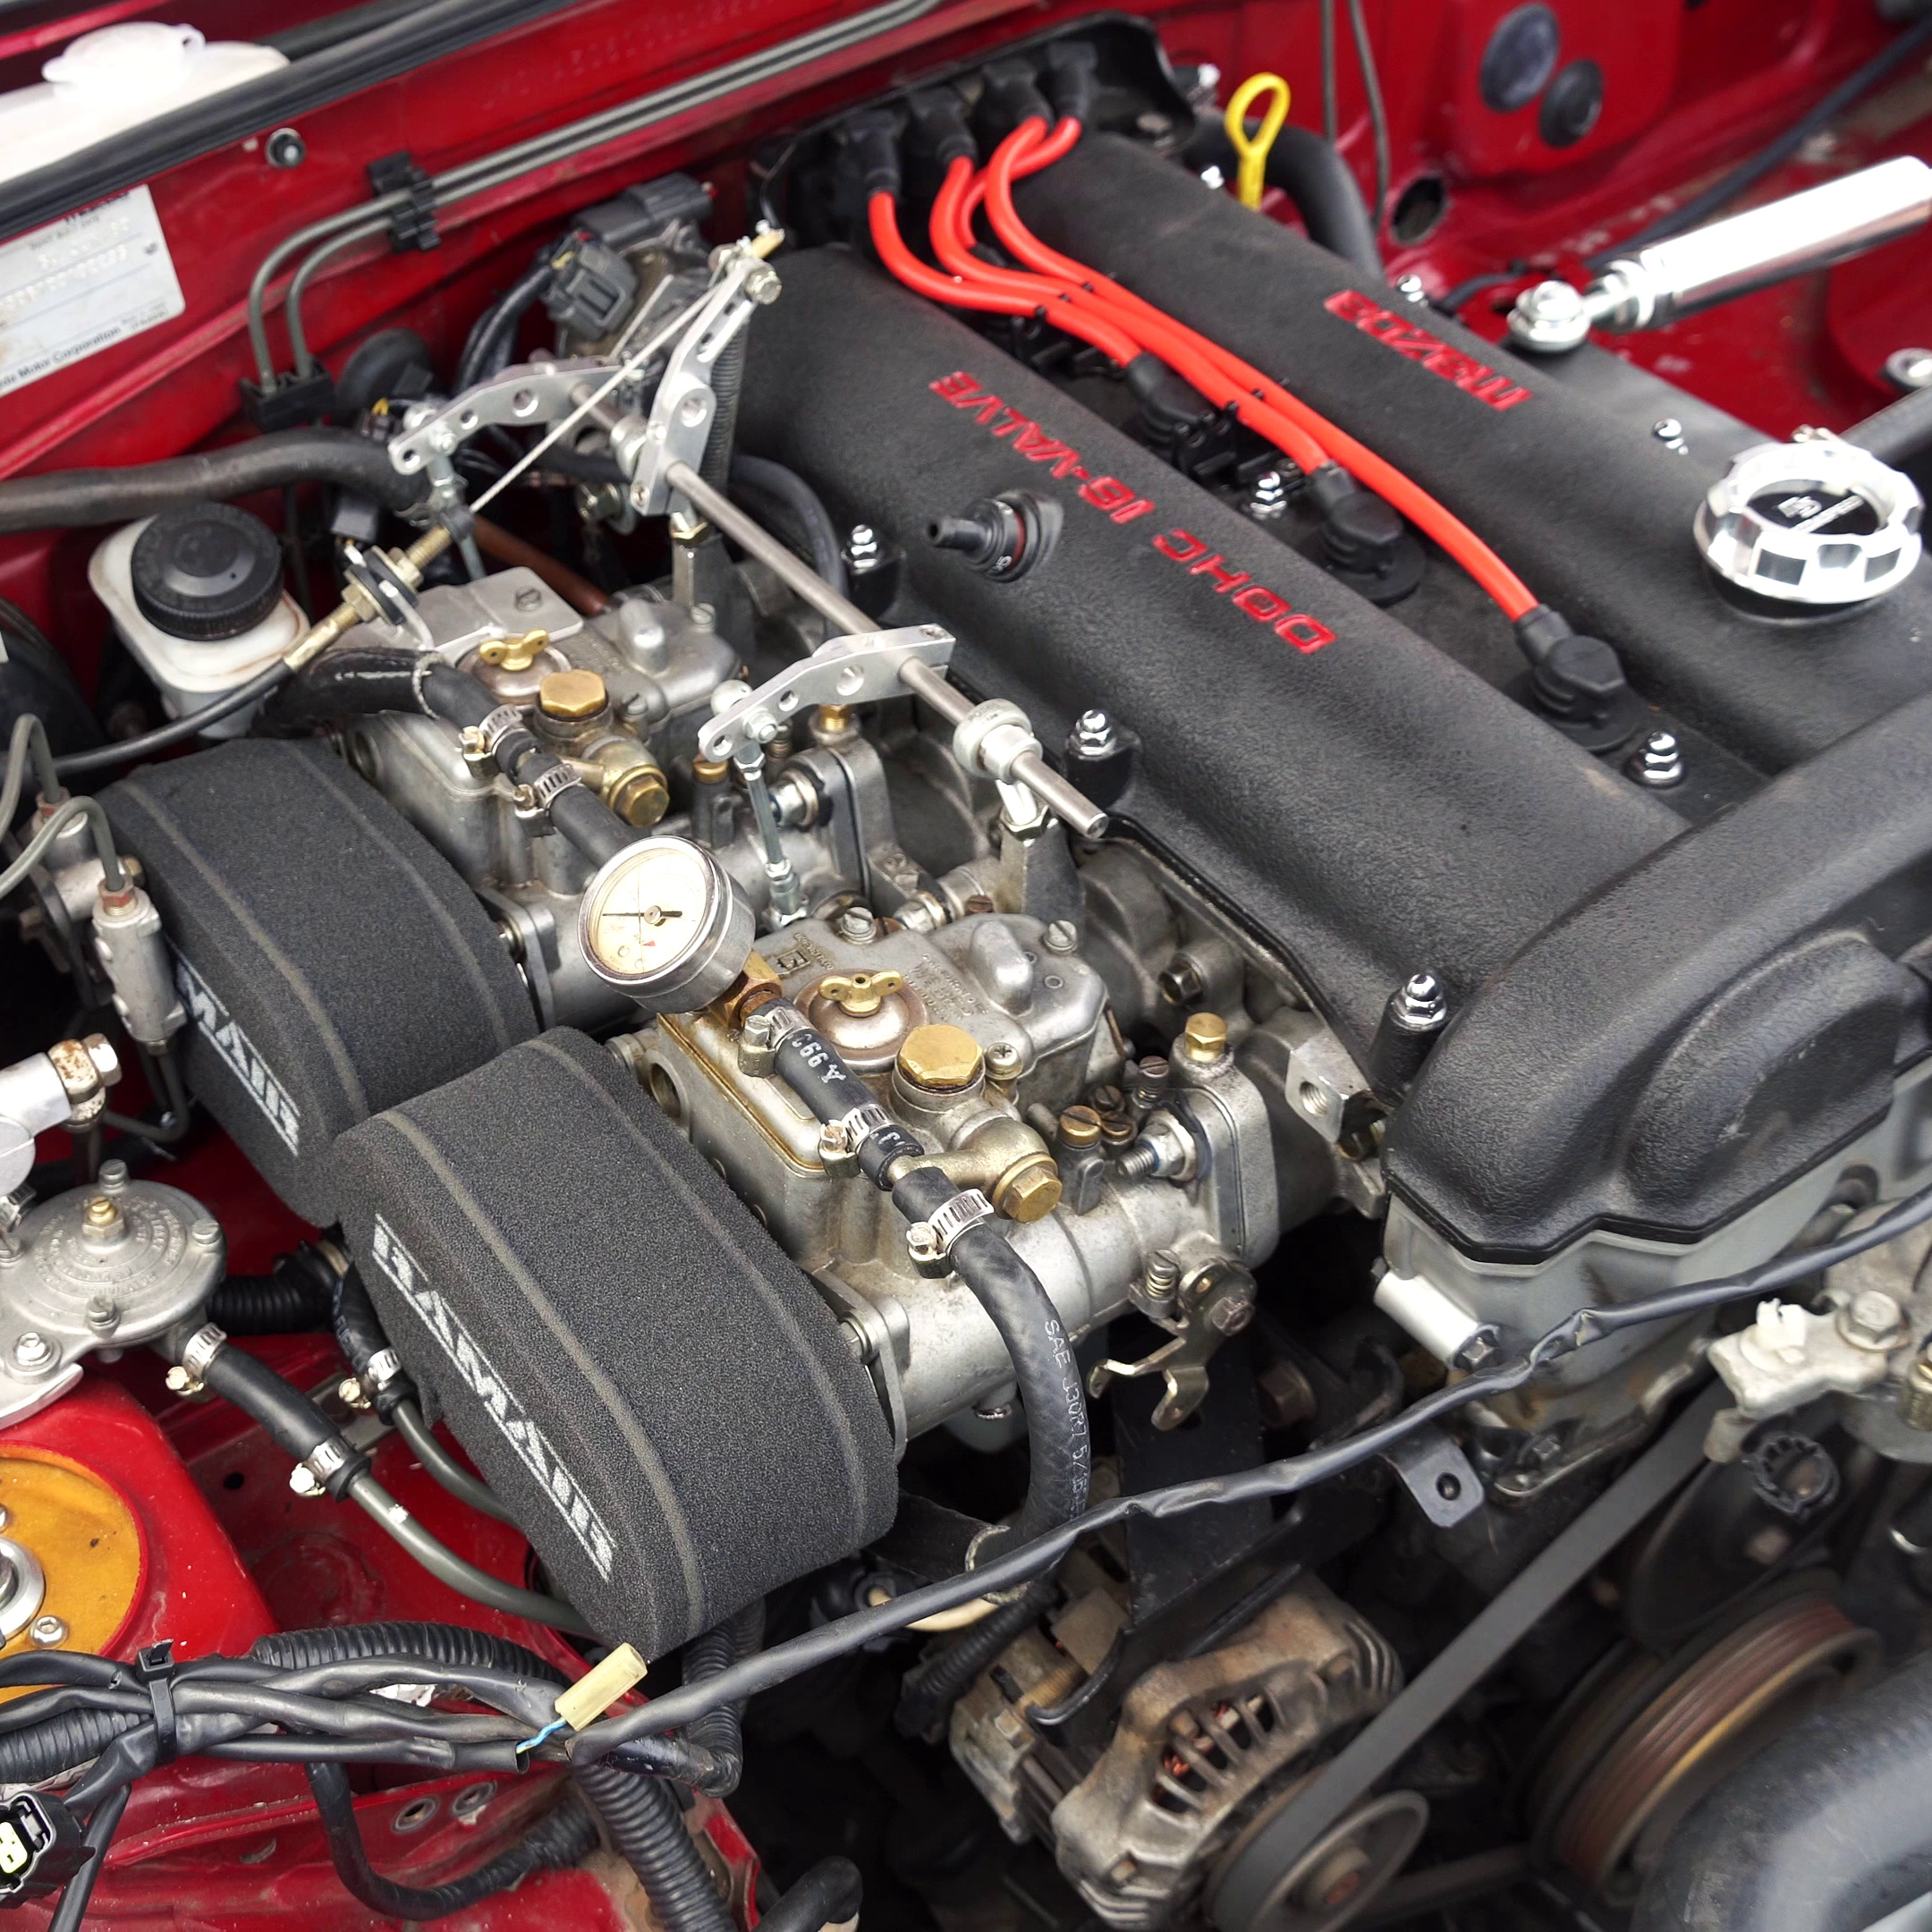
With that done, the carburettors can be mounted to the engine. This requires a special manifold designed specifically for the application. Mazdaspeed manufacture a suitable part for both the 1.6 and 1.8 litre Miata engines, which allow twin Weber carbs to be fitted, and this is what our project used.
The fuel system in an EFI car usually runs at between 30 and 70 PSI, far above the 7 PSI required for the average carburettor. To solve this, a fuel pressure regulator must be fitted that is specifically designed for carburettor use. This can be installed in the engine bay near the carbs, as there’s plenty of space with the original intake hardware removed.
There’s also the matter of ignition. Timing advance is computer controlled, based on the signals from the cam angle sensor and the air flow meter, which give the ECU the ability to calculate the load on the engine. With the air flow meter deleted, it’s no longer possible for the ECU to know how much timing to run. This can be left as-is, but without a proper timing curve, the engine is giving up performance.
Normally this would be handled by a distributor. Due to the design of the Mazda B6 and BP engines, it’s not practical to switch to a classic distributor-based setup. Instead, there are two common methods used to spoof the air flow meter signal to the ECU, enabling it to properly control the timing. A throttle position sensor can be installed onto the throttle linkage of the carburettors, with the throttle position standing in for air flow as a load signal.
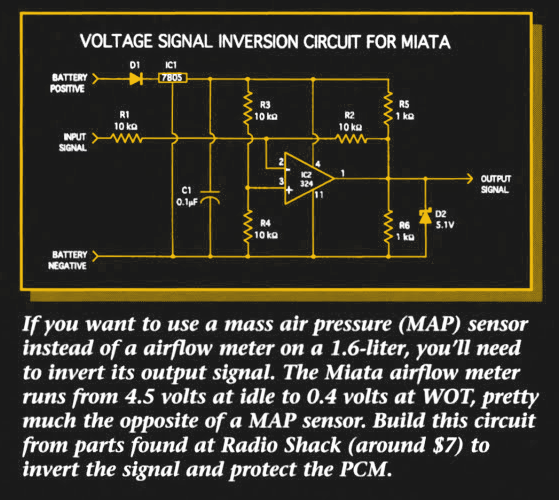
Alternatively, a manifold air pressure sensor can be installed, sensing the vacuum in the inlet port. This signal can then be inverted, similarly emulating the original air flow meter closely enough to serve as a good reference for engine load. Depending on your tastes, you may prefer the mechanical complexity of the throttle position sensor, or the electronic complexity of the MAP sensor route. This author favored the former, but the owner favored the latter, and thus we set about building an inverter circuit for the car.
Like any major engine modifications, there’s also a litany of additional tasks to be done to get things up and running. On this build, the throttle cable required modification, and the lack of vacuum available from the carburettor manifold meant the brake booster was no longer as effective. Like any big project, expect pitfalls along the way.
Electronic Pitfalls: Wrong Side of the Connector
I was primarily involved in the electronic side of the build, whipping up an op-amp circuit to invert the MAP sensor signal, as designed by Norman Garrett. As per the schematic, this relies on an LM324 op-amp to do the work. Only a single op-amp of the four available is used, set up in an inverting configuration with a gain of 1; i.e. simple inversion, with no amplification. This is intended to be used with a common GM 3-bar map sensor, which is readily available either new or used, having been used in millions of cars worldwide.
After whipping up the circuit on some perfboard, we struggled to get things operating reliably. After trying to power the circuit from the 5 volt line in the air flow meter connector, we gave up and used a 7805 regulator with the Miata’s 12 V auxiliary feed in the engine bay. Unfortunately, despite this, we still had issues. The circuit was simply outputting either 0V or 5V all the time, rather than cleanly inverting the MAP signal.
With little idea of the root cause, the circuit was rebuilt with scrap parts, substituting an LF356 op-amp. This worked in limited bench testing, but again began to play up when connected to the car. As is the way, several hours of frustration ensued until it was realised that we’d read the diagrams backwards. As drawn in the Mazda Miata Performance Handbook, the AFM connector is shown from the side of the air flow meter itself, not the wiring loom in the car. With this oversight rectified, we were able to get the circuit running, and the signals inverting nicely. Without a dyno or any high-end diagnostics available on the Miata ECU, it was difficult to determine how much of an effect the circuit has, but we proceeded to take the car out for a test drive.
Performance: Your Foot Makes the Engine Soar
In short, driving a carby Miata is an absolute hoot, above and beyond the stock model. There’s a touch more power on tap, of course. But above all else, the snap of the throttle is intoxicating, with the engine surging ahead with the slightest twitch of the pedal. Induction noise is also gleefully present, and combined with a good exhaust system, the raspy bark is to die for.
Obviously, there are also some notable drawbacks to the setup. It’s unlikely to pass emissions rules in jurisdictions where that matters, and cold start performance would be diminished in areas where frost and snow are a regular occurrence. There was also the issue of a small flat spot in the powerband around 4000 rpm. Without the time to conduct proper A/B testing, we were unable to track down a definite culprit. Suspicions lay around the carburettor intake setup sacrificing mid-range torque for top end power, or the op-amp substitution causing issues as the LF356 is not a rail-to-rail part like the LM324.
Regardless of the tradeoffs, the final product was a dream to drive, and had the underhood looks and soundtrack to match. For those daily driving, it might not be the best choice, but for the weekenders who want to impress at the local car shows with some old school charm, it’s a heck of a way to go.