If you’ve been kind enough to accompany me on these regular hardware explorations, you’ve likely recognized a trend with regards to the gadgets that go under the knife. Generally speaking, the devices I take apart for your viewing pleasure come to us from the clearance rack of a big box retailer, the thrift store, or the always generous “AS-IS” section on eBay. There’s something of a cost-benefit analysis performed each time I pick up a piece of gear for dissection, and it probably won’t surprise you to find that the least expensive doggy in the window is usually the one that secures its fifteen minutes of Internet fame.

But this month I present to you, Good Reader, something a bit different. This time I’m not taking something apart just for the simple joy of seeing PCB laid bare. I’ve been given the task of repairing an expensive piece of antiquated oddball equipment because, quite frankly, nobody else wanted to do it. If we happen to find ourselves learning about its inner workings in the process, that’s just the cost of doing business with a Hackaday writer.
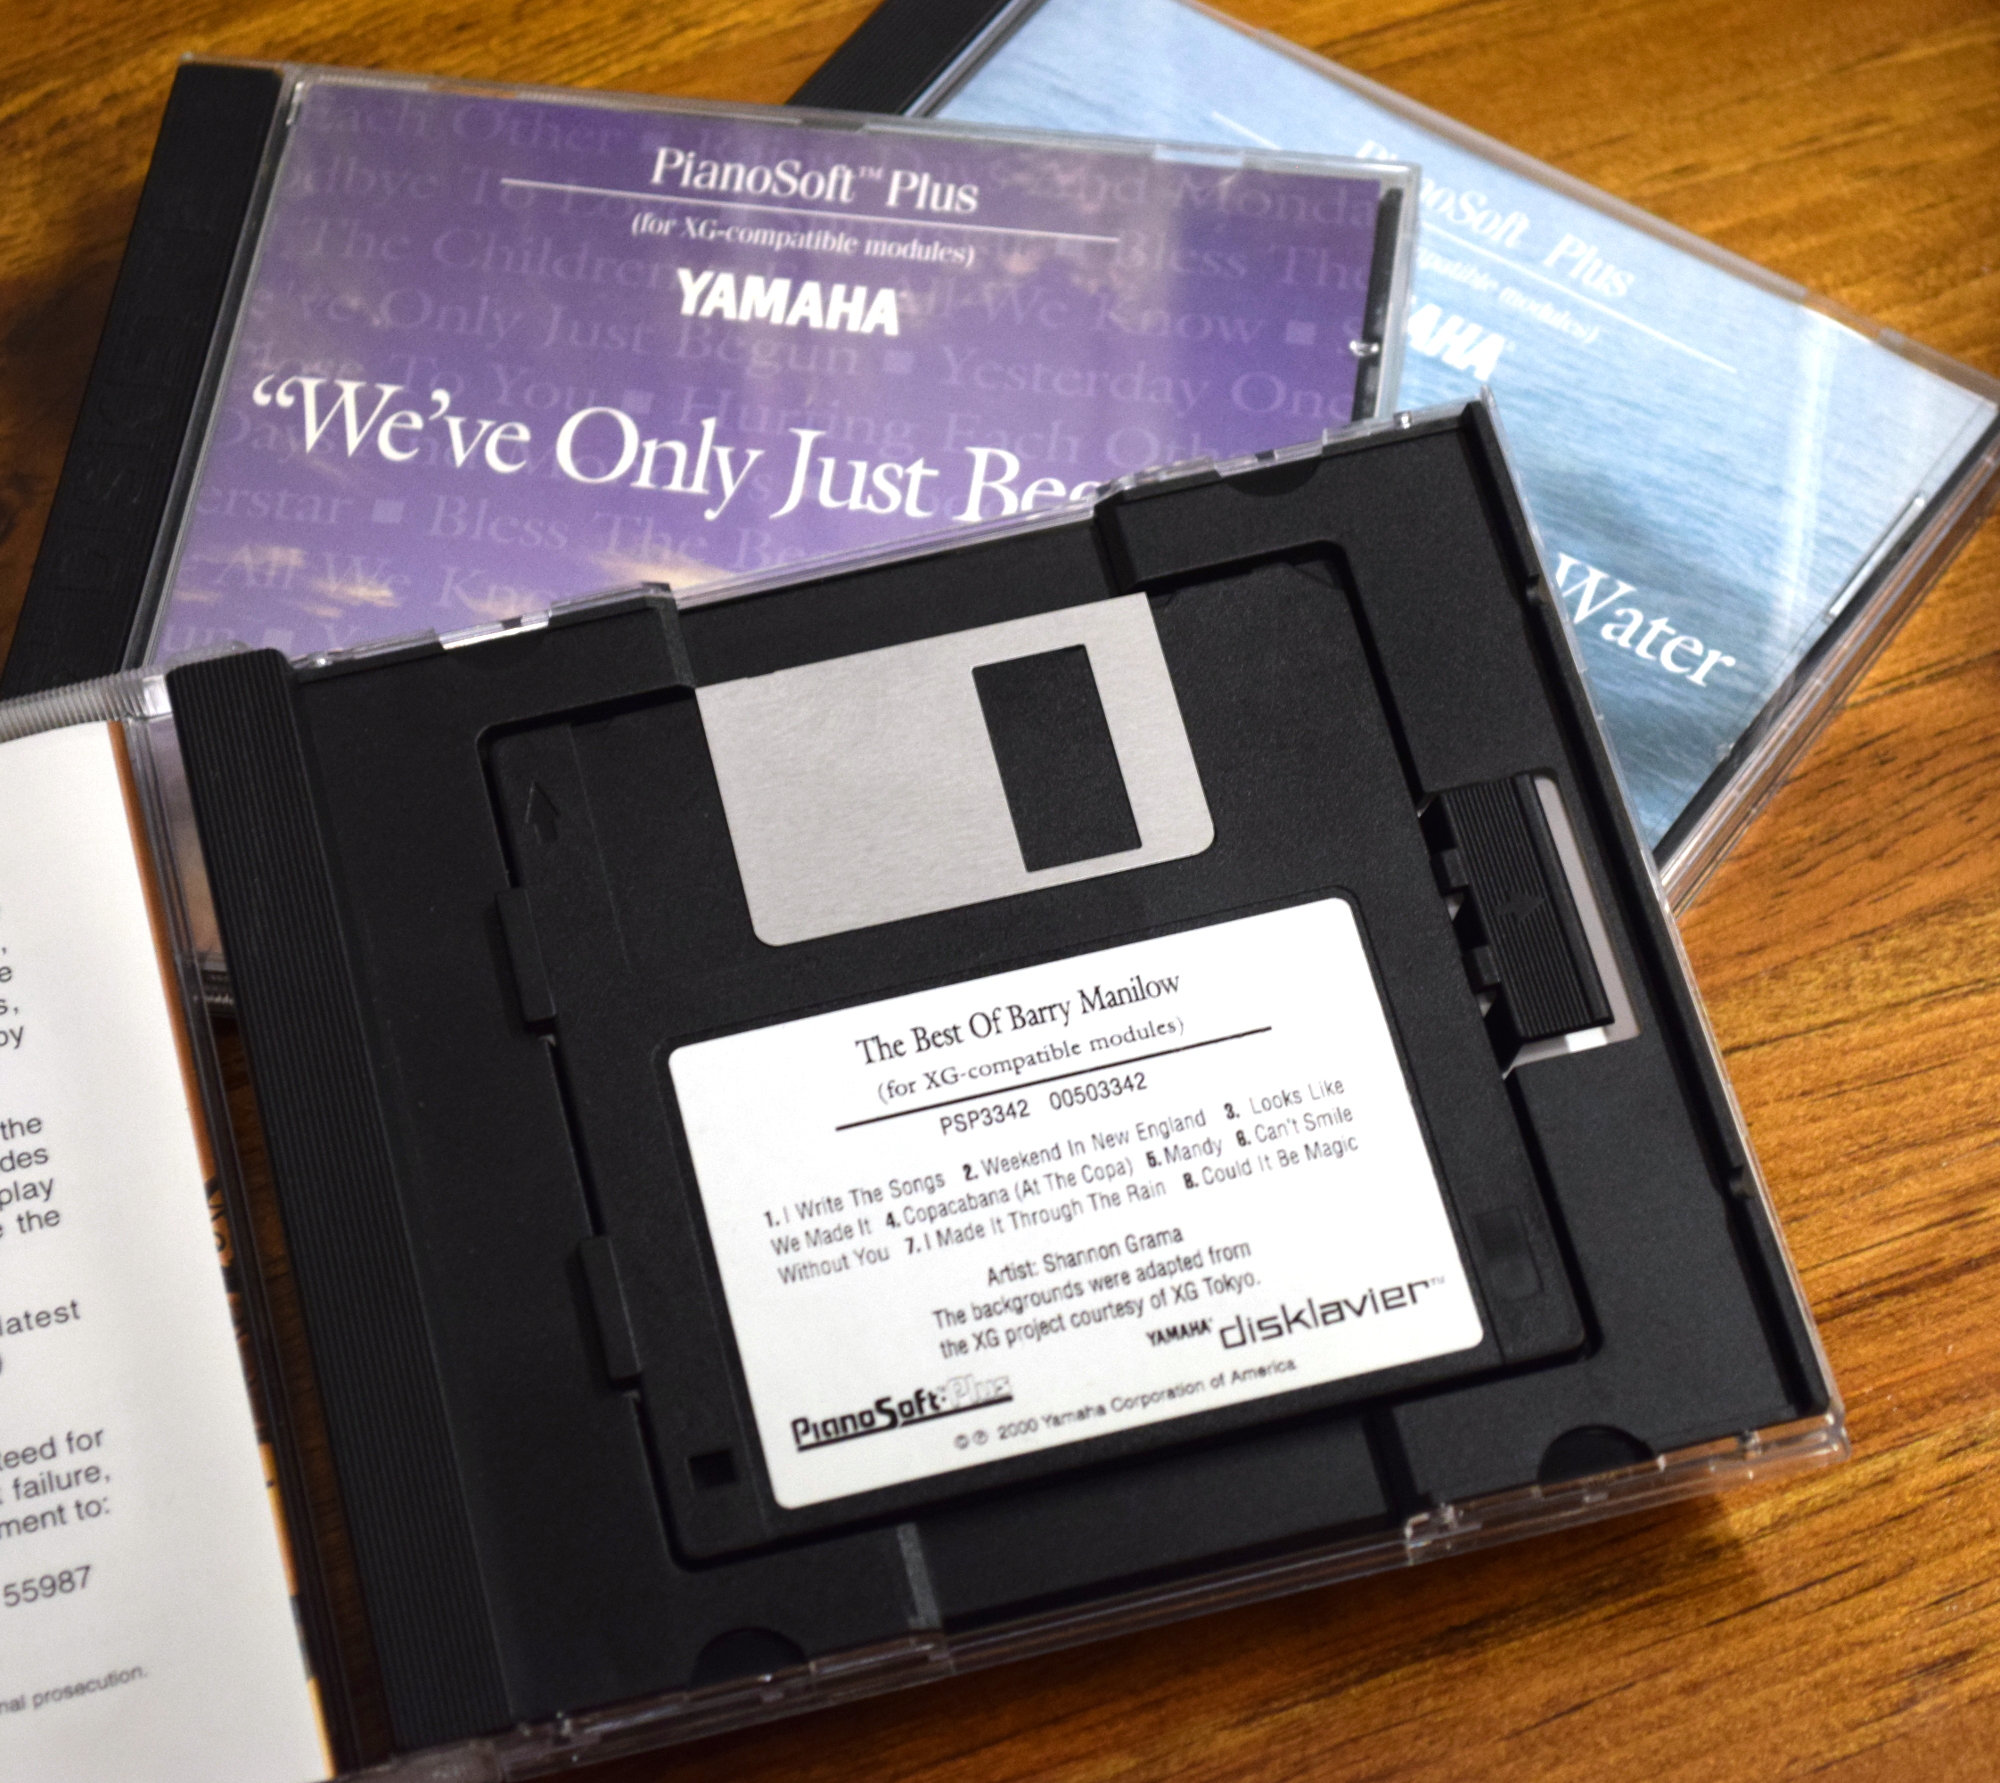
The situation as explained to me is that in the late 1990’s, my brother’s employer purchased a Yamaha Mark II XG “Baby Grand” piano for somewhere in the neighborhood of $20,000. This particular model was selected for its ability to play MIDI files from 3.5 inch floppy disks, complete with the rather ghostly effect of the keys moving by themselves. The idea was that you could set this piano up in your lobby with a floppy full of Barry Manilow’s greatest hits, and your establishment would instantly be dripping with automated class.
Unfortunately, about a month or so back, the piano’s Disklavier DKC500RW control unit stopped reading disks. The piano itself still worked, but now required a human to do the playing. Calls were made, but as you might expect, most repair centers politely declined around the time they heard the word “floppy” and anyone who stayed on the line quoted a price that simply wasn’t economical.
Before they resorted to hiring a pianist, perhaps a rare example of a human taking a robot’s job, my brother asked if he could remove the control unit and see if I could make any sense of it. So with that, let’s dig into this vintage piece of musical equipment and see what a five figure price tag got you at the turn of the millennium.
Beauty is Only Skin Deep
The look and feel of the DKC500RW reminds me of a DVD player from the early 2000s, back before they started selling them at grocery stores. It’s got a nice solid construction, and all of the buttons and controls feel pretty much like what you’d expect for a piece of gear that cost as much as a car. Yamaha made sure this thing had all the trappings of an expensive piece of electronics, at least externally.

On the inside though, it looks for all the world like a cheap VCR. The half-populated tan PCB and haphazard wire routing immediately reminded me of the dusty thrift store gadgets that I occasionally strip for components in the post-RadioShack era. In general, the inside of the device is sloppy and looks like it was thrown together at the last minute. Very disappointing.
One Size Fits Most
I wasn’t able to find any useful information from the various numbers on the silkscreen, but I get the distinct impression the main PCB in the DKC500RW would have been shared among other devices in the Disklavier family. In that case, the other PCB is something of an afterthought; a shim necessary to get the primary board working in this particular configuration. Certainly the differences in build quality and board complexity are night and day.
 There’s also a large number of unused connectors, which would potentially link up to alternate control panels or storage devices. From the research my brother did, it seems that some of the control units featured optical drives and even hard disks. I’d love to get a look inside one of the higher-end models to see how they compare.
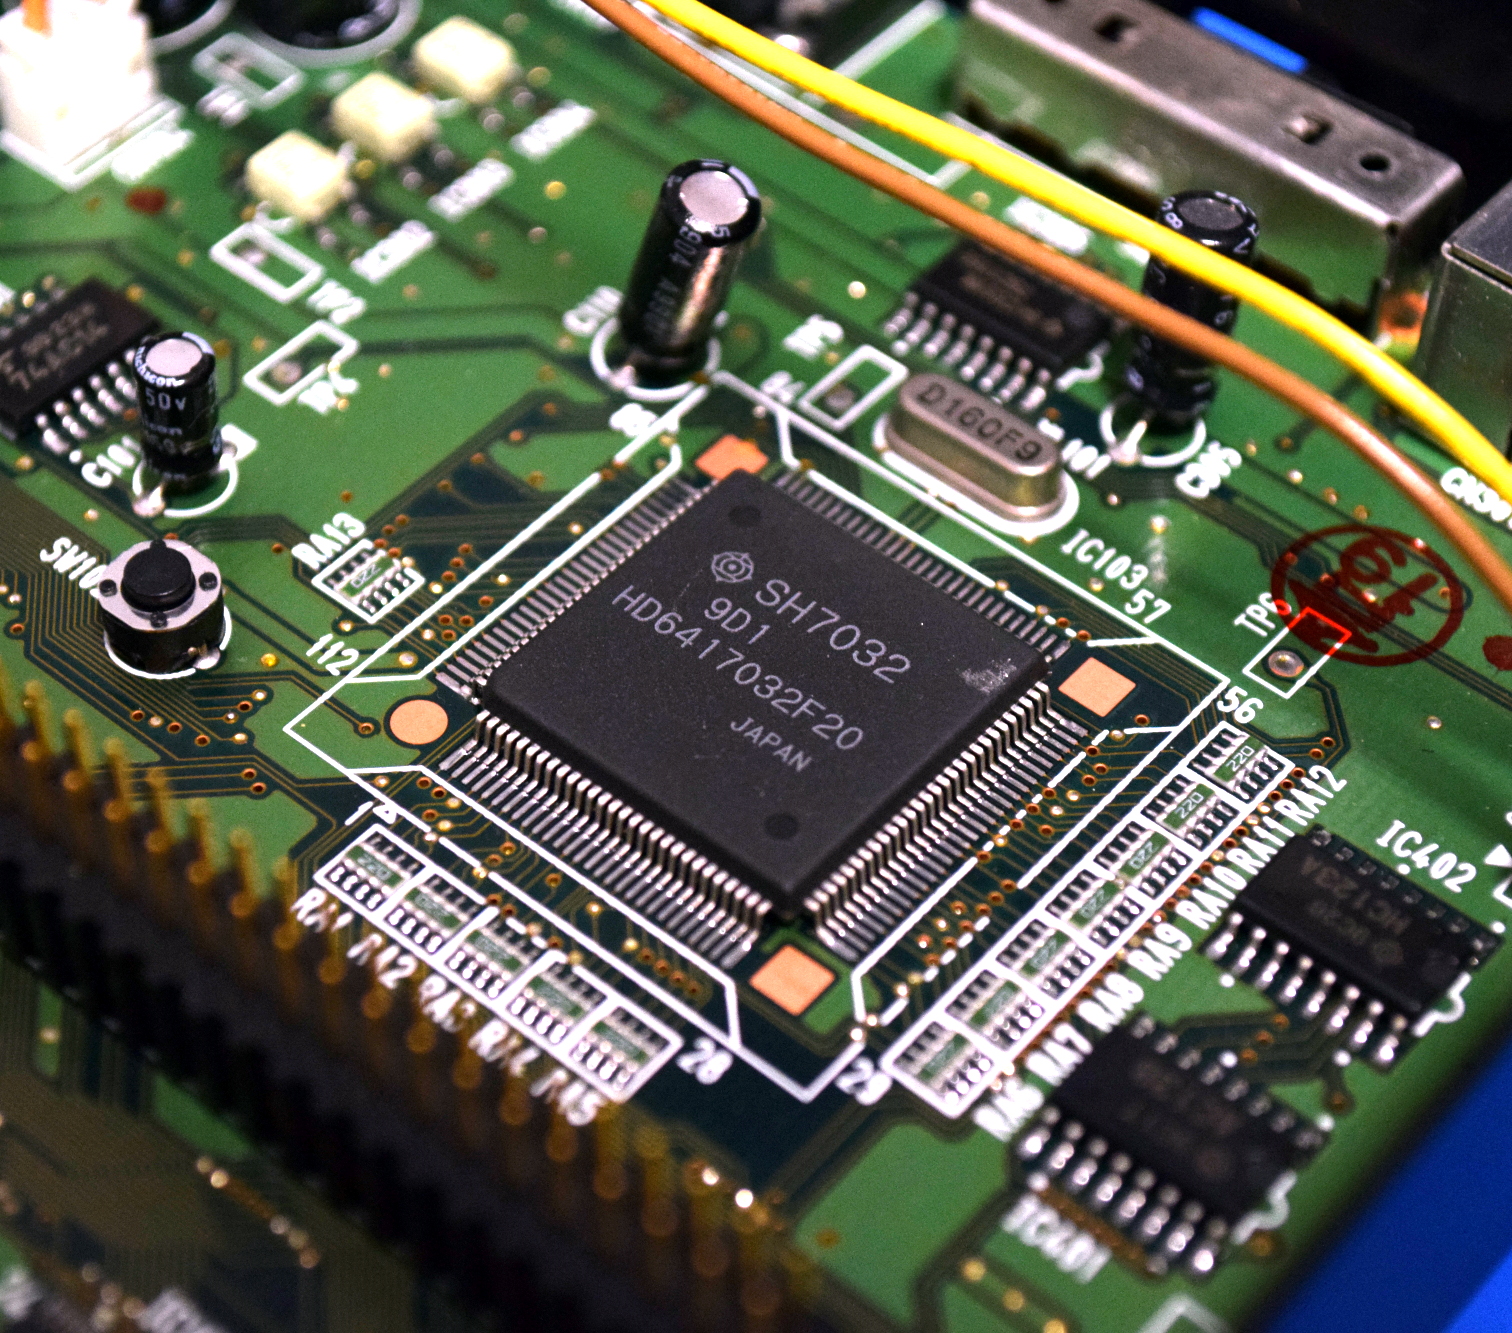
The star of the show here is the Hitachi SH7032, a 32-bit RISC processor running at 20 MHz. Incidentally, it looks like this chip (or at least a similar variant) is supported by Rockbox, an open source firmware for digital audio players. So if you’re looking for a challenge and see one of these control units at a swap meet, you might try your hand at getting it to run DOOM.
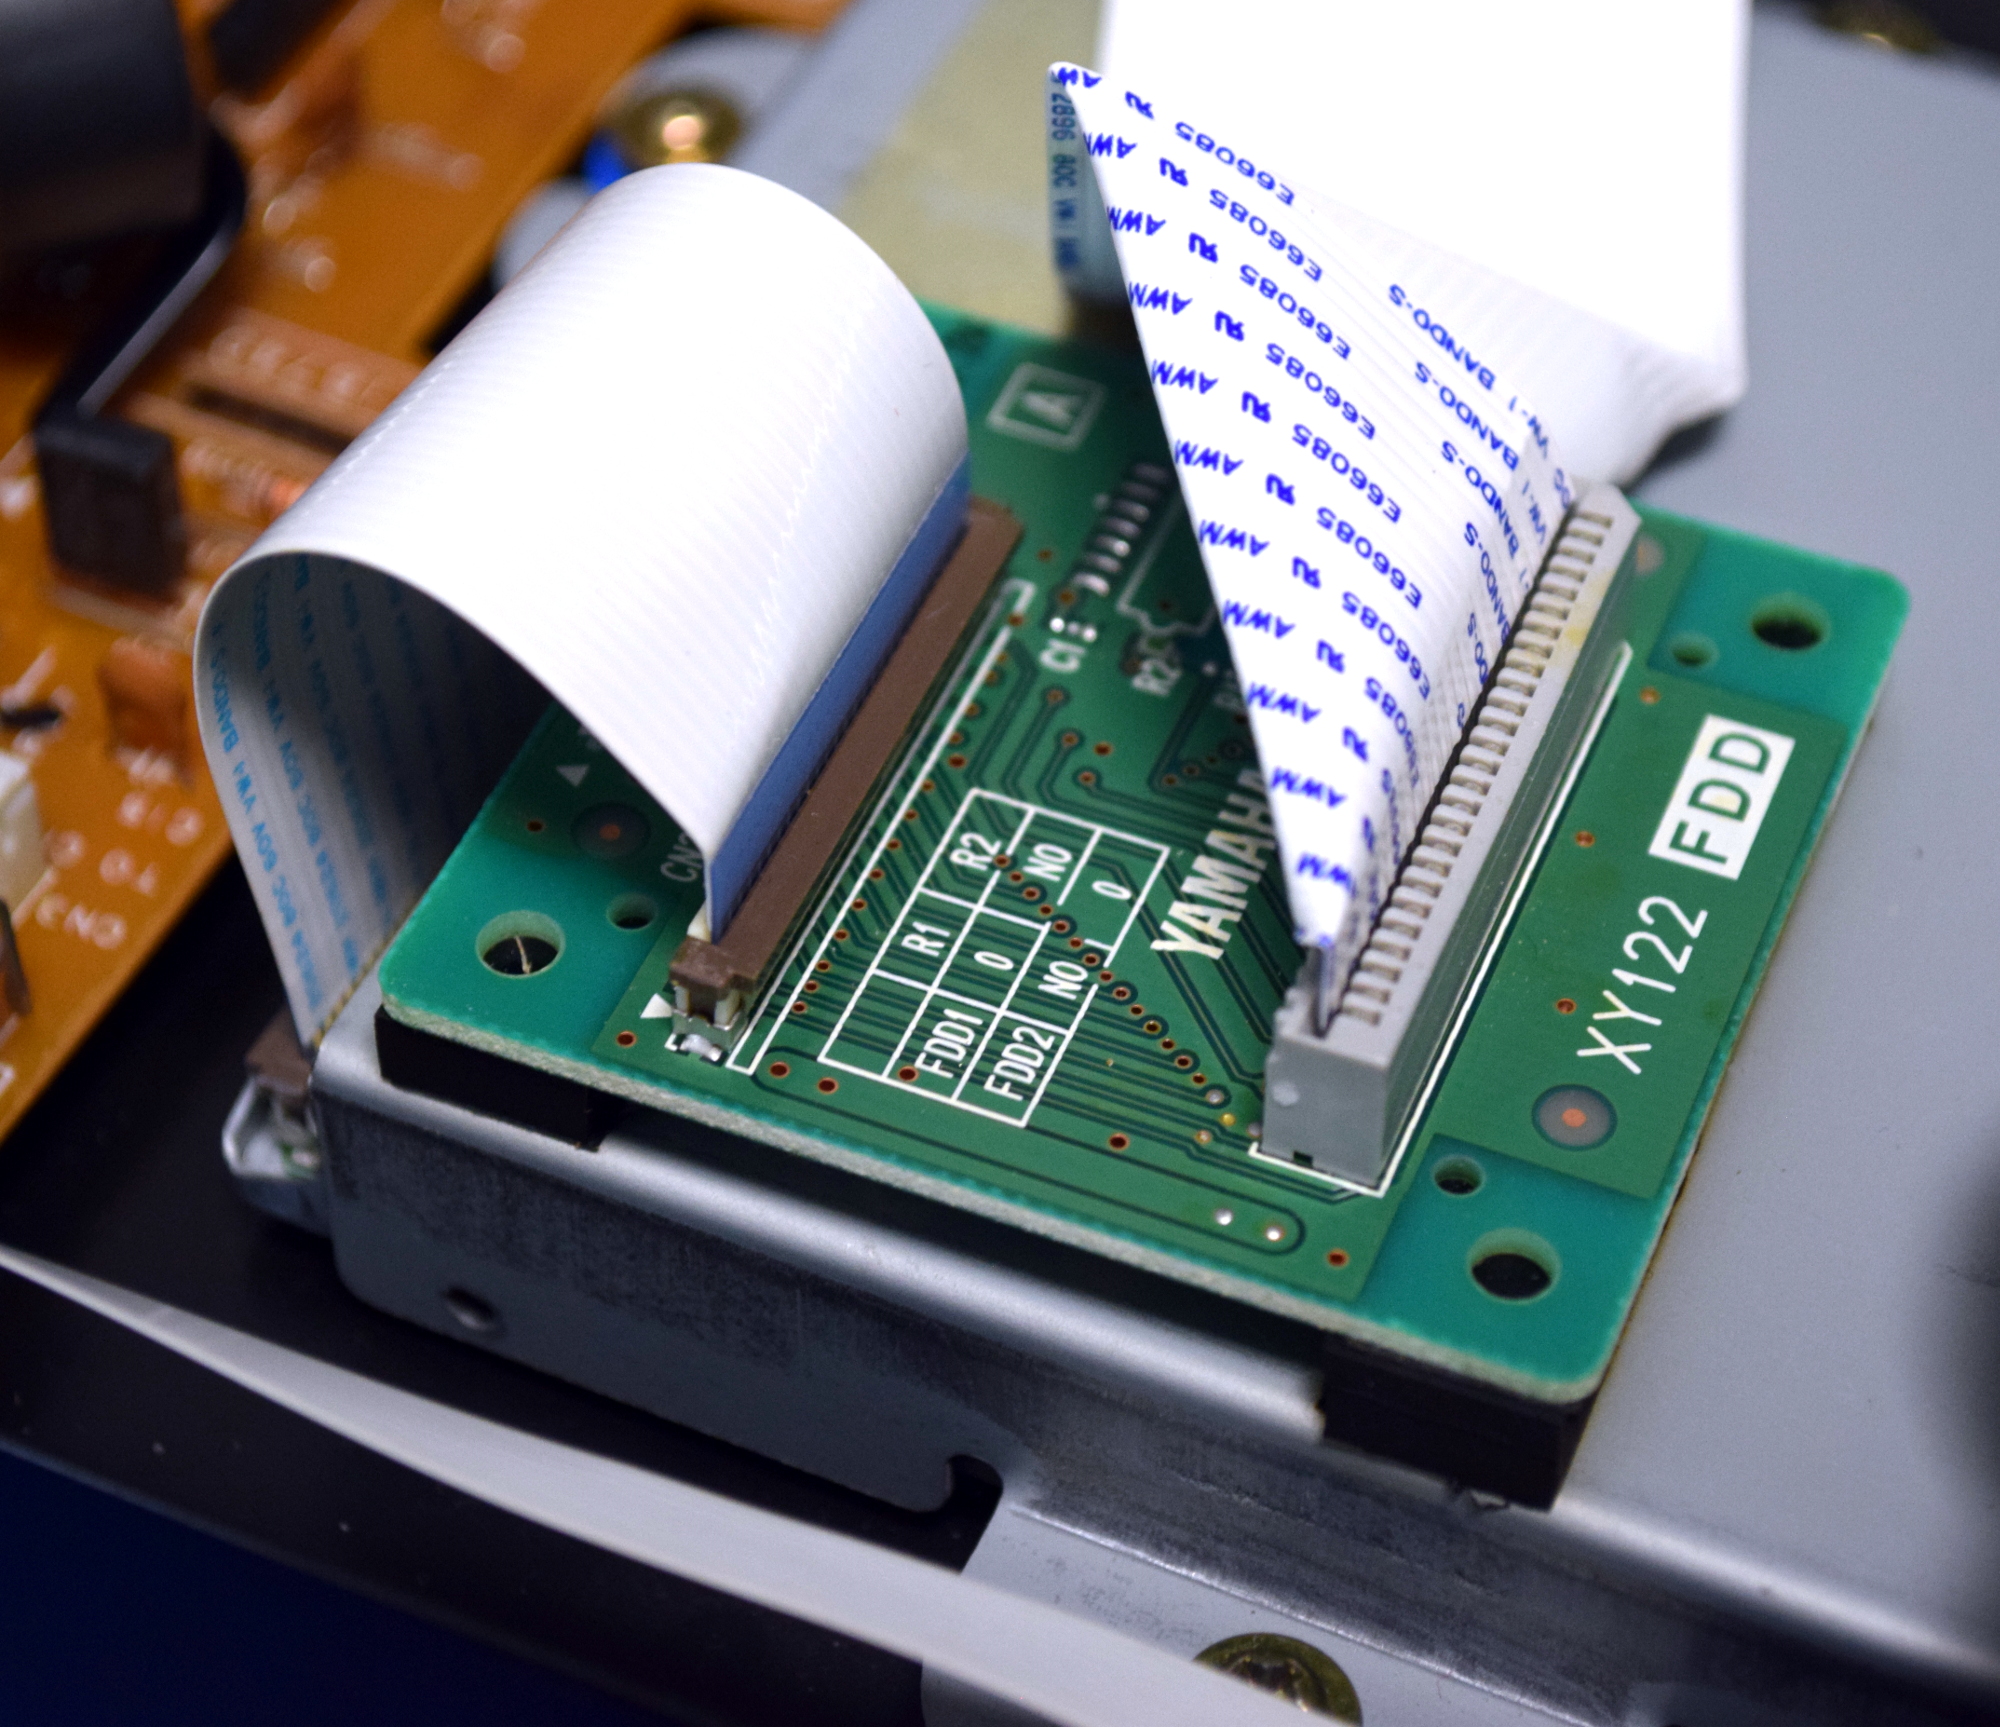
Looking around the board we also see an M38881M2, an 8-bit microcontroller from Mitsubishi, which is connected to a few 74AC574 flip-flops. It seems this chip is in charge of interfacing with the front panel controls on behalf of the SH7032. Next to the ribbon cable heading to the floppy drive, there’s also a HD63266F floppy disk drive controller. A lot of the other chips have their markings obscured, but it doesn’t seem like there’s many surprises to be had in any event.
The Floppy Root of the Problem
The first step to figuring out what was wrong with the DKC500RW was getting it powered on. Unfortunately, I couldn’t find a pinout for the DE-15 connector that linked it to the host piano, nor did I know what voltage to give it. But I did see a LM7805 with a beefy heatsink on the main board, and after hooking the adjustable power supply to the input and ground legs, it fired up without any complaints.
I tried a few of the disks intended for the system, and sure enough the device reported they were unreadable. Even blank disks caused an immediate error message on the screen. Looking through the settings, I noticed it had a function to format the disk. Curious about what would happen, I gave it a blank disk and waited for it to finish. Once formatted, the DKC500RW recognized the disk immediately. Uh-oh.
Now there’s probably a large number of people reading this who’ve never worked with a floppy drive before, and wouldn’t know why this turn of events is significant. Basically, it’s not unheard of for a floppy drive to become so physically out of alignment that the only disks it can read are the ones it formatted itself. If you’ve got the magic touch it’s possible to realign a drive in this condition, but I don’t know anyone who’s ever pulled it off personally.
My brother had already got a quote of several hundred dollars for a replacement floppy drive from a company that still services these pianos, but looking at it, it didn’t seem like anything special to me. It appeared to be a basic laptop floppy drive, with some sort of pin-switching adapter attached to it. Taking it apart, I was eventually able to find markings on the drive that identified it as a Mitsumi D353F3. A replacement was sourced on eBay for the princely sum of $8 USD, and once installed, the DKC500RW was able to read every disk we threw at it.
Digital Archaeology
 My brother took the DKC500RW back to his job, reinstalled it without issue, and now the sweet sounds of Copacabana can once again be heard wafting through the halls. He’s the big hero, and I toil away in obscurity. Such is life.
But there’s actually a bit more to the story than that. In the week or so it took the replacement drive to arrive, I started wondering if there was anything I could do with this stack of weirdo Yamaha MIDI disks before they had to go back. It turns out that as a rudimentary form of DRM, the disks have no boot sector or traditional file allocation table (FAT). Accordingly, any operating system that tries to mount them just sees them as corrupted.
However, with a hex editor and an amount of time I’d rather not admit to, I was able to figure out the structure of the disks. From there, I started work on a Python script which can list and extract the individual audio files from a disk image. In the exceedingly unlikely event you’re interested in ripping the MIDI files from your personal collection of Yamaha Disklavier 3.5 inch floppy disks, you can follow along with that project over at its Hackaday.io page.