One of my favorite ways to think of engineering is that a glass is not half empty or half full, only twice as large as it needs to be. As useful as that idea is, it also means that I rarely put any effort into the aesthetics of my projects – I learn or accomplish what I need, desolder and recycle the components, then move on. Few of my projects are permanent, and custom cases tend to be non-reusable, so I skip the effort and expense.
Once in a while though, I need to make a gift. In that case form and function both become priorities. Thankfully, all that glitters is not gold – and over the last year I’ve been learning to etch the copper alloys commonly classified as ‘brass’. We’ve covered some truly excellent etched brass pieces previously, and I was inspired to try and etch larger pieces of metal (A4 and larger) without sacrificing resolution. I thought this would be just like etching circuits. In fact, I went through several months of failed attempts before I produced anything halfway decent!
Although I’m still working on perfecting my techniques, I’ve learned enough in the meantime to give a report. Read on if you’re feeling the need for more fancy brass signs in your life.
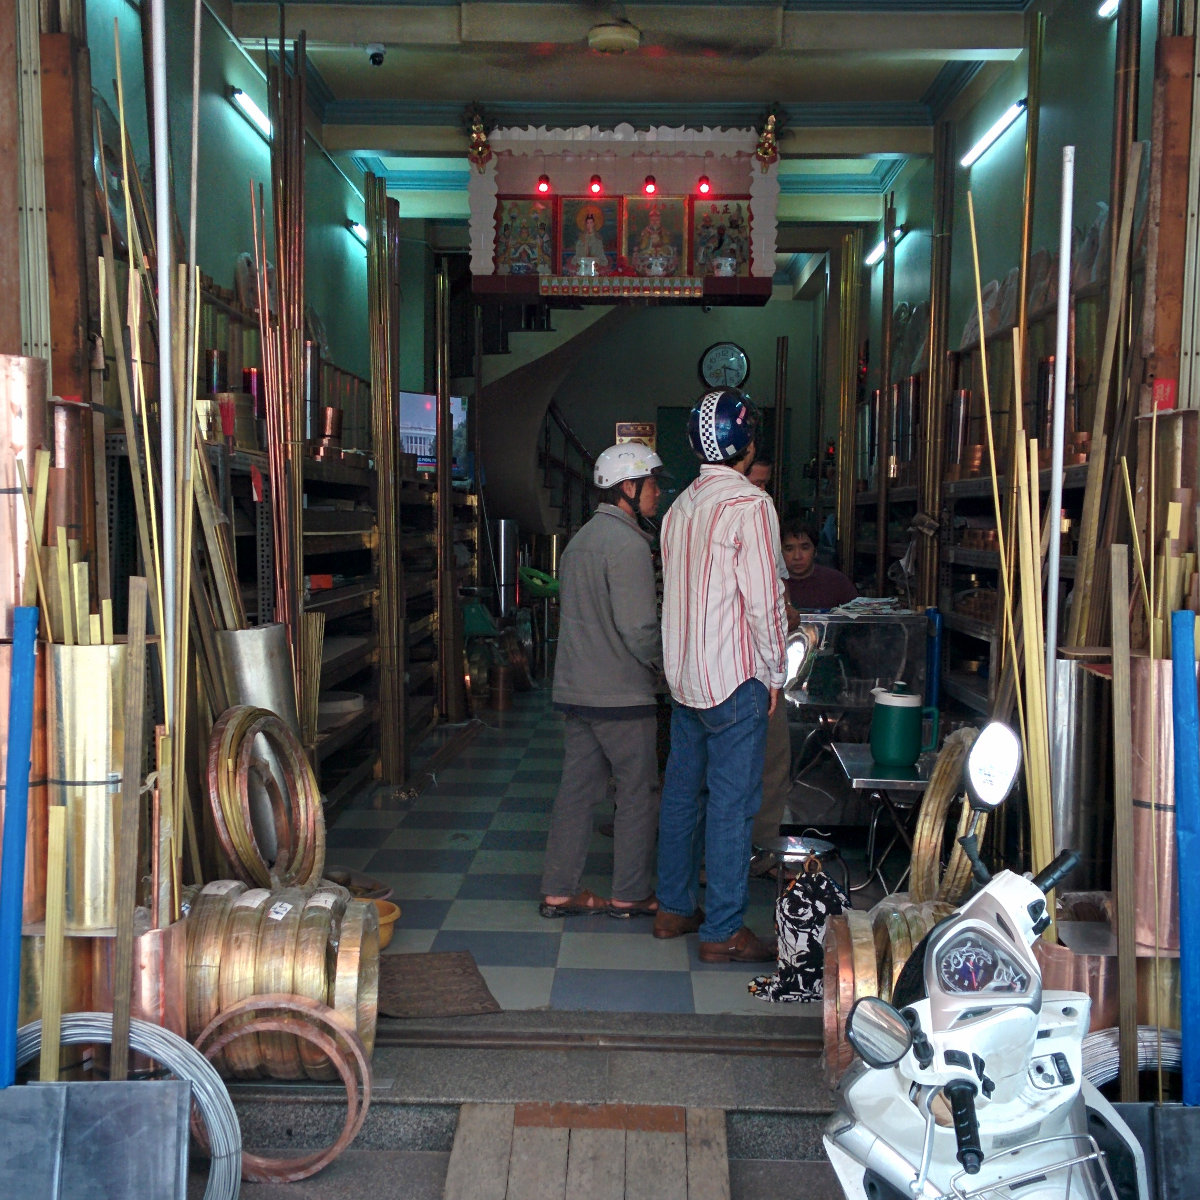 In Asia, brass is a very common decorative material, and I can easily buy it as needed at USD $9 per kilogram in a variety of forms. I started by purchasing about 10 kg of brass sheets, rods, and foils to work out what was practical.
The first lesson learned was that cheap brass flashing, a sort of 0.2 mm thick foil that comes in a roll, just fell apart during etching. The zinc reacted out much faster than the copper, leaving a brittle and ugly mess of copper. This problem disappeared when I used thicker brass, typically 1 mm to 2 mm thick from China or Taiwan, both proved to be good quality.
Not So Hot
The second lesson learned was that even relatively thin brass foil (around 0.2 mm) sinks heat much more than a PCB of equivalent size. I usually etch circuits using the toner transfer method, approximately as detailed here. I found that a clothes iron could not typically heat the brass enough to fuse the toner properly. I attempted two methods to get around this: switching to heat-free processes and using higher-powered heating.
I tried three types of heat-free processes. In the first, I simply bought UV photoresist sheets and tried to adhere them to the brass. I quickly found that my photoresist sheets were terrible, and it was practically impossible to avoid bubbles forming between the photoresist and the brass pretty much everywhere, even when applying the photoresist underwater.
I reasoned that painting on photoresist wouldn’t have that problem, but could not find any local source of photoresist paint. As a result I bought some UV-cure acrylic (the kind used by nail salons). Unfortunately, the curing process did not result in a usable resist: the areas shielded from UV still hardened just enough that I couldn’t clean the brass sheet properly with solvent afterwards. Nonetheless, I suspect a better method of applying photoresist, such as paint or spray, would produce superior results.
I did find that UV-cure acrylic works very well as an etch resist when cured, although it requires some patience and a nasty solvent to remove. One advantage it has is a long working time in a environment with very low UV light. I ended up using it for touch ups when I had an acceptably working process.
As a final attempt to avoid high temperature processes, I tried applying a mixture of about 15% xylene and 85% methanol (xylene and water are not miscible) to the printed paper to render the toner sticky enough to adhere to the brass, press it on, and let it dry before soaking in water and removing. The toner did become sticky and adhere a little, but I found that it did not adhere to the brass as well as it did with applied heat. Applying both organic solvents and heat was not something I had the equipment to try safely, so I gave up on that avenue as well.
Into the Fire
Having given up on low-temperature processes, I focused on heating the brass sheet to a high enough temperature to reliably transfer toner without burning myself terribly. An iron or document laminator were not powerful enough except for very small pieces of brass, and I was interested in etching large panels to paint and use as signage, kitchenware, panel art, or components of furniture.
I knew from previous experience that a heat press for t-shirts would work fairly well — I had tried on steel and large PCB panels — only requiring some touch-up on the edges of the piece. However, a heat press isn’t something I have space for at home right now, and they aren’t that cheap either. Thankfully, with a little bit of preparation and practice, my gas stove worked just fine.
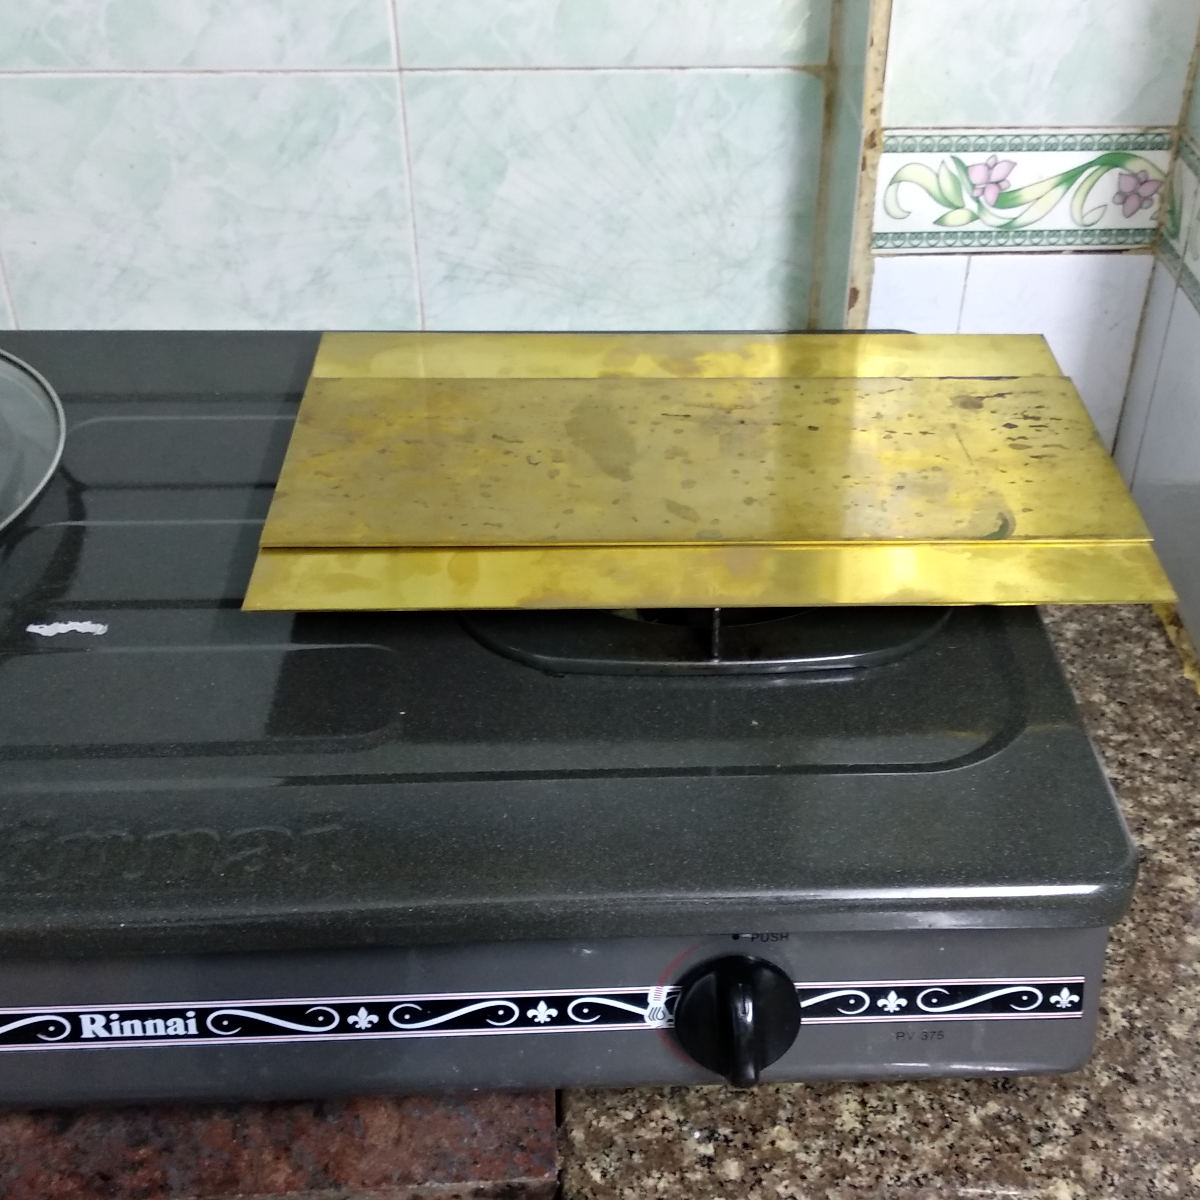
The key turned out to be placing a large 2 mm thick brass sheet across my stove element, and placing the smaller piece on top of it so that pressure could be applied to any point on the piece without risking flipping any hot pieces of metal off the stove and onto myself. It’s worth practicing this a a few times without any heat applied to be sure your setup is as stable and as safe as you think it is!
I heated the brass to a temperature where it would melt toner, but not burn paper, then turned the stove off. With the more massive bottom sheet acting like a heat sink, I placed the paper toner side down on the piece, placed a cotton cloth over it, and used a rolling pin to apply even pressure. I then heated it up again turned off the stove, and repeated the process for a good even bond.
I could have probably used my electric oven to heat the brass instead, but the gas stove proved fast and effective.
Regardless, you’ve got a fair mass of hot metal here – analogous to taking cookies out of the oven on an abnormally heavy baking sheet. It’s not searing hot, but is hot enough and has sufficient thermal mass that it can burn you painfully. You’ll likely want to wear appropriate clothing and shoes. My preference is to also keep a container full of water, oven gloves, and a fire extinguisher at hand.
Touch Up
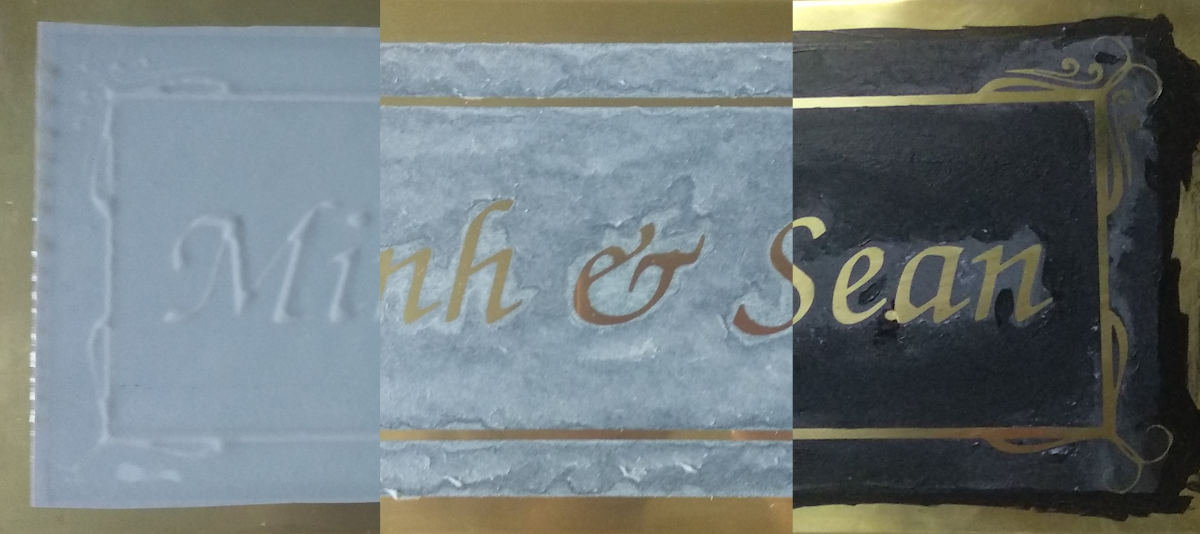
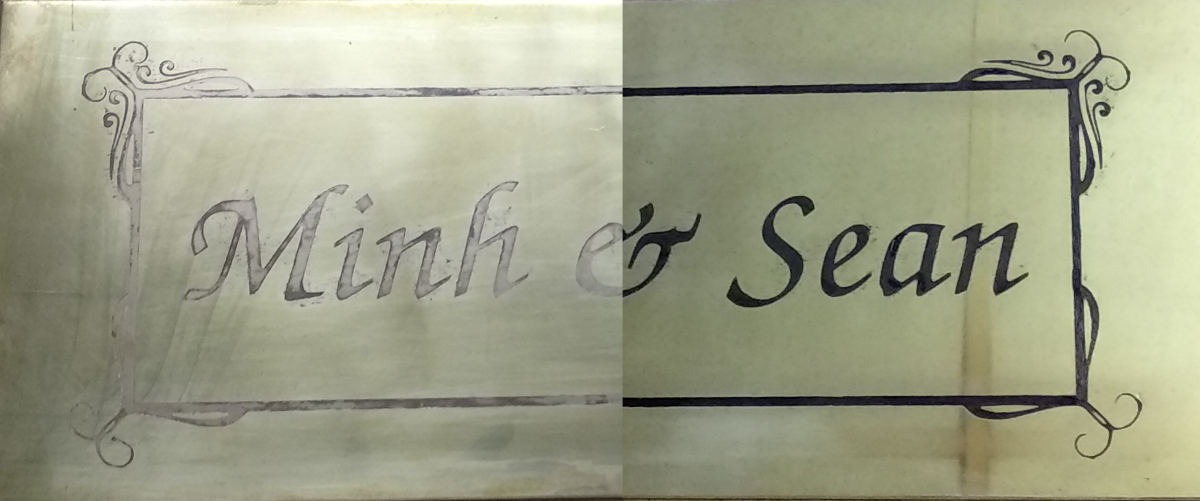
The result of the above was that I could transfer toner onto much larger and thicker pieces of metal. Probably anything larger than A3 size would require refining the method. Regardless, there were some minor imperfections in the toner coverage. For a circuit this would be OK, but here it affects the looks significantly.
To fix these errors, first I cleaned most of the paper off the piece so that all areas meant to be etched were fully exposed. Then I used UV-cure acrylic nail polish to correct any areas where the toner visibly didn’t bond. I worked in a room lit with non-UV sources so I wouldn’t have to worry about working time. Once the corrections were done to my satisfaction, I left the brass piece out in the sun for two minutes to cure. Next I rubbed black water-based acrylic paint into the piece and then quickly wiped clean and let dry. The idea here was that there were enough paper fibers still adhered to the toner that the acrylic paint would soak in a little, and provide additional protection to the areas covered with toner. Meanwhile, it wiped clean off the exposed brass areas. This noticeably decreased pockmarks caused by small amounts of etchant slipping past the toner.
Finally, I taped down the edges, as well as any large uniform areas of toner, to maximize the protection against the etchant. I could see the tape and acrylic both helped keep the etchant contained within useful areas. I carefully sponged on ferric chloride for around 20 minutes. Hydrochloric acid requires police documentation to purchase in my area and earlier experiments using electro-etching produced unsatisfactory results.
After etching, I removed the toner using xylene while outdoors and with a large fan to my back. Safety aside, I have strong opinions about which organic solvents smell the worst and xylene is near the top of the list.
Back In Black
I tried two methods for painting: the first was to use linseed-oil-based lamp black – literally the type of black paint used in fancy oil paintings. This produced the nicest result at first, but took excruciatingly long to do, proved impractical when it came to fine details, and had poor mechanical resistance to abrasive brass polish. It also takes at least a week to dry.
The alternative method is to paint the sign approximately correctly with water based acrylic paint, let it partially dry, then lightly sand the sign down with very fine grit sandpaper. The paint will have a tendency to remain in the grooves that you’ve etched. You keep painting, sanding, and repainting until the pattern you’ve etched is fully painted. Then you repolish the sign and hope it all stays in place.
Sadly, I could not find a store that carried enamel oil paints (the type for painting plastic models came to mind). That would have probably worked far better. I also considered using a black wax crayon or sealing wax, then heating the sign and letting it flow into the etched grooves.
As a final step, you may consider protecting your work with a varnish, although this is not strictly necessary. I’ve found the paint stays well enough to tolerate light polishing with brass cleaner. Now you can frivolously make everything out of brass, just like in Dwarf Fortress.
I think a fair conclusion would be that of all the methods I applied, toner transfer produced the best results, but significant improvements should be possible with UV-cure etch resist. The biggest issue with toner transfer was the etch resist did not completely prevent etchant from reacting with the brass, especially near the edges of the piece. I think this could be resolved with spray or paint on UV-cure etch resist, or perhaps even film of less suspect quality.
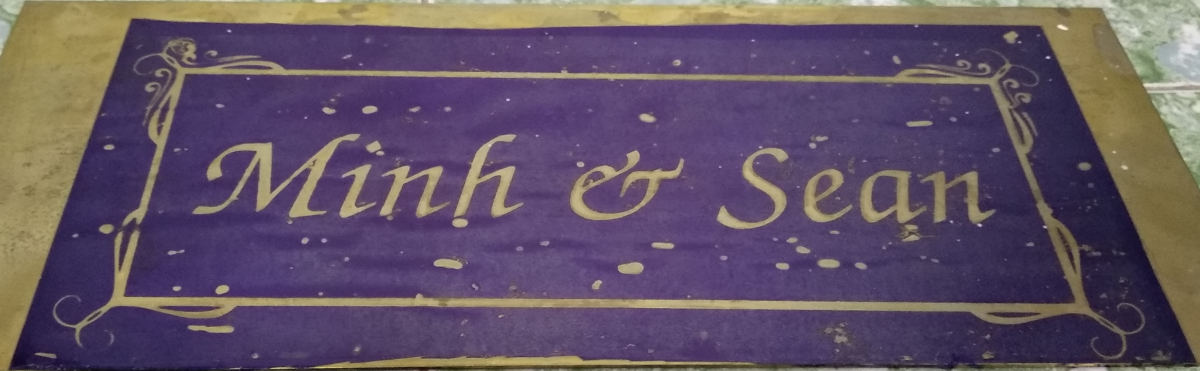
Incidentally, the gift I later made with this process was for a friend’s wedding, and it turned out quite well the day before the ceremony. A fortunate result to a few months of tinkering, but progress continues.